how to install a window ac unit in a travel trailer
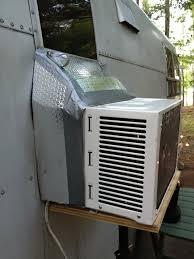
From Rob at Vintage Vacations: I on installing the unit on drawer slides under the dinette bench with a cargo door for access. The idea was so simple; it should have won an award! The unit was secured to a piece of plywood, on heavy duty drawer slides. open the door, slide the unit out, and turn it on. The “inventor” took care of several issues with the installation, noise was reduced by the dinette framing and cushions, correct balance was maintained by placing the unit forward of the axle, and the only modification to the trailer was a vent in the face of the dinette frame. Alana Piper's outside of the box solution: A $19 PA stand from Amazon, $100 wall unit, piece of scrap plywood and a dollar store windshield shade work great. From Mark Judd:A drawing is always worth a 1000 (or more) words! But basically you need to make sure that the hot air exit vents are not blowing that air into the hot air intake vents at the back of the A/C unit, the part which is outside the camper.

The hot air getting sucked into the A/C unit should be at ambient temperature, so it should be like about 90 - 100F and the air exiting the A/C unit is going to be about 120 or 130F, so you need to make sure this air does not find its way back to the hot air intake vent, or your unit will never cool. Same with the inside of the Scotty. The cold air intake vent needs to suck air in that is from the same room the cooling air is exiting to. Cooling air is about 60F and cool air intake vent is about 80F (at least after the Scotty cools down a bit). If this cool exit air finds its way back into the cooling side of the A/C unit with out warming up first, it will freeze up your cooling coils and no cold air will come out. Unit is installed under the gaucho. Don says he wishes he'd installed a unit with a remote control which would be easier to use when gaucho is a bed. Don replaced the standard access door panel with a vent which he painted white Looking at it from the vent/door

A mirror view from underneathAlthough modern air-conditioning systems have replaced most window air conditioners, these units are still available. If you’ve found a home or apartment you love that doesn’t have central air conditioning, cool off by installing a window air-conditioning unit in a crank window with this step-by-step guide. First, open the window by using its crank handle. Continue to crank the window open until you get to the stopper point. Next, use a screwdriver to take out all the stopper screws. Put them in a safe place so that you can replace them at a later date if need be. Use a screwdriver to detach the operator control arm from the bracket. If the crank window in your room comes with a vent-control plate, take this off by removing the screw and sliding the plate control away from the hinge plate. Next, take the hinge arm off of the window frame by unscrewing the screws. Also, veer the window crank handle away from where you’re working.

Grab the window sash tightly and move the lower and upper hinges away from the window frame.
types of ac transmission systemTake off the hinge by unscrewing the screws.
cleaning outdoor ac unit Put in the mounting brackets that are a part of your air-conditioner kit with socket wrenches.
global ac unitIf your house is made with stone or brick, you might need to drill starter holes to complete this step. The air conditioner needs to be installed from the inside. You will also need a helper for this step on the outside. Pick up the air conditioner, and put it in the window. Slowly nudge it outside. As you’re doing this, your outside helper must guide the air conditioner and assist in holding it up. Do not push any more once the inside bottom lip of the unit meets the window sill.

Affix the window unit to the mounting brackets using bolts or screws, with sockets or a screwdriver. With measuring tape, stretch and measure from the top lip of the inside part of the machine to the window-sill top, and also from the left to the right side of the window. Then, cut your plywood accordingly. Put the plywood you just cut into the opening, and seal it at each edge by using clear silicone caulking. Extract the side extensions on the machine, plug the air conditioner in, and switch it on. Once you’ve followed the preceding ten steps, you will have installed a window air conditioner in a crank window. To increase the life of your unit, weatherize the air conditioner for winter. I have a 1969 Airstream Ambassador travel trailer with the original air-conditioner. I like to upgrade things while keeping them as original as possible. I decided to rebuild the air-conditioner (new compressor, new fan motor), but while I was at it, I figured I would turn it into a heat pump as well!

A heat pump is just an air-conditioner that can change the path of the refrigerant. In cool mode, the refrigerant goes from the compressor to the heat exchanger outside the cooled space (condenser), through the capillary tube (or thermal expansion valve, TXV), into the heat exchanger inside the cooled space (evaporator), and then back to the compressor. In heat mode it goes from the compressor to the heat exchanger inside the heated space (condenser), through the capillary tube (or TXV), into the heat exchanger outside the heated space (evaporator), and then back to the compressor. Remember, heat flows out of the evaporators and into condensers. This unit uses a capillary tube to restrict refrigerant flow and generate the pressure needed to condense the refrigerant. Modern units use TXVs to regulate the pressure of system. While they are more efficient, they generally only work when the refrigerant flows in one direction unless they are specifically designed for heat pumps.

A capillary tube is a long, thin tube that is a specific diameter and length to generate a specific pressure. There are no mechanical parts in a capillary tube, therefore refrigerant can flow through it in both directions. So in order to make this A/C a heat pump, I only needed to add a reversing valve and reroute the copper tubing. Here's what I did: -Remove unit from roof of trailer. -Get part numbers of compressor and fan motor to find compatible replacements, if needed. -Measure copper tubing diameter so you can but a compatible reversing valve. Reversing valves come in different sizes based on how big the unit they are designed for. Try to find a valve that has the same size fittings as the copper tubing in the A/C unit. If not, you'll have to get adapters to step up or down sizes. Remeber, refrigeration copper is "tubing" and is measured on the outside diameter and not "pipe" which is measured on the inside diameter. Step 1: Install the piecesShow All Items« PreviousNext »View All Steps Download