cleaning outdoor ac unit

YORK, Pa.-- With high temperatures over the next few days, now is not the time to have your air conditioning unit fail you. "The biggest thing that people can do right now to help their air conditioning system is [to] check the air filters," F.W. Behler Inc. President Dave Yates said. F.W. Behler is an air conditioning company in York. Yates said dirty filters are one of the biggest problems he sees each year. He also recommends to wash the outdoor coils of your unit. Simply take a garden hose and wash them from the top to bottom. "That dirt that's out on those outdoor coils can rob that system by as much as 10 percent or more efficiency and reduce the cooling capacity," he said. Then there is using your air conditioner efficiently. You can close up to 15 percent of the registers in your home to make it easier on you air-conditioning unit. "So the idea is to find one area where you can totally comfortable and those unused rooms, it doesn't matter if they get comfortable," Yates said.

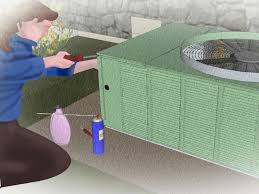
Yates recommends setting your thermostat to one temperature and leaving it there. He said to turn off any set-backs your system may have. "To make it back from 82 to 78, or 76, or 74 degrees is not going to be a quick result," Yates said. "It can take a day or more for that to happen." Even with these tips, Yates is expecting numerous calls for problems, and he said his crew are ready to tackle the challenge. "We'll ask everybody who works here to be available for the on-call guy so that when we do hit a peak of emergency calls, we can respond and get those done in a timely fashion," Yates said. Yates posted a full list of tips on his Facebook page. 1: Install new air filter(s). Insufficient air-flow reduces the delivery of cooling and can shorten the life of your equipment! 2: Clean the condenser (outdoor unit) coils. Turn off the power first to the outdoor unit. Set your garden hose to spray, not full-force nozzle, and wet the coils working from top to bottom.

If you have a hand-pump sprayer, fill it with water and dish detergent & spray that into the coils – again working from top to bottom.
air handling units how do they workRinse away with the hose spray.
carrier hvac parts suppliesDirty outdoor coils that “look” clean can rob you of 10%, or more, efficiency and reduce cooling capacity.
window ac unit isn't cold 3: Let the condenser breathe! Trim back shrubs or bushes at least 24”. FYI: your condenser coil should be a minimum of 18” away from the wall. This allows for proper air-flow across the condenser coils to strip away heat from the Freon inside the coils. 4: Shade the condenser. If your condenser is baking in the hot sun, provide it with shade by setting up a beach umbrella, but do not place the umbrella directly over the top of the condenser because that’s the discharge for hot air from the condenser fan.

There should be no air-flow obstructions within 5’ overhead of the condenser. 5: Make sure your windows and doors are closed securely. Replace worn weather stripping. 6: Grill outdoors – no indoor cooking. 7: Turn off incandescent lighting. A 100-watt light bulb produces as much heat as one human body at rest (341-Btuh). Turn off TVs when not actively watching. 8: If you have unused rooms, close off the supply registers and close the doors. No more than 15% of the total number of registers should be closed off or your total system air flow may become too restricted for proper energy exchange across the evaporator (indoor coil). 9: If you are using an automatic or programmed reset thermostat, take it out of reset mode. Set the temperature you want and let it stay at that setting. 10: Schedule annual service by professionals!Possibly the single most important factor to maintaining your air conditioning unit is keeping it clean and well maintained. Not only will good maintenance reduce your energy consumption and save on your monthly bills, but clean condenser coils will make your A/C unit last longer and keep it running efficiently.

You can also read “How To Clean Central A/C Evaporator Coils” Here. There are different types of air conditioning units but for the purpose of this article, we’ll be talking about a central air split unit system.They are most common in the Dallas area and can be found all around the country. A split system comprises the inside unit, which contains the evaporator, located inside a central duct attached to your furnace/blower within the house and the compressor/condenser unit that sits alongside the exterior of the house. You can click on any of the images on this page for a larger one if you want as well. Cleaning the compressor coils and cooling fins of your outdoor unit once per year is recommended under normal conditions, but more often if there is a lot of growth around the unit or cottonwood trees or dandelions nearby. These are clogging culprits. For comfort and cost savings, this ranks as the top regular chore you can perform yourself on your air conditioning unit.

For this project you will need a garden hose, a good *spray-on foaming cleaner and a *cooling fin comb if the fins are badly bent. Basic tools like a wrench or screwdriver will be required to remove the A/C unit cover. You will also want a shop-vac and a medium stiff brush (but be very careful when cleaning cooling fins, they are very fragile and can bend easily. Cleaning just the outdoor unit will probably take an hour or more if it’s your first time, so allow yourself enough time to do a good job. If you aren’t up for the task, you can hire an HVAC professional to do it for you. They will clean your outdoor and indoor units, check your freon level and make recommendations for you anywhere from about $69 (“special” or promotional) to around $150 for a general upkeep cleaning. Most companies run spring and summer “specials” because they know most units will need charging with freon or other work. This is still a good route to go if you want to watch a pro do it first, if you suspect that you are low on freon or have a specific problem or questions you need answered.

You can also purchase a bi-yearly maintenance contract, which can save you money and make maintenance automatic. Or, you can easily learn to do-it-yourself. Before I do anything, I always make sure the thermostat is set to “off”. Then I remove the main power switch located inside the master switch panel. The master switch is almost always attached to the house at the same location as the unit itself; simply open the panel and pull out the large plug. Once the power has been shut off, you should remove as much debris, growth and lawn clippings from the outside of the unit that might inhibit the flow of air as possible. Remove the top of the unit. There are typically hex-head bolts or screws that you can see on the top of the unit or on the side at the top. The fan motor is usually attached to the top of the unit and you don’t want to bend the blades or damage it. Have someone hold the top of the unit or lean it carefully aside, making sure not to rest it on the fan blades or stretch the wiring.
You can easily clean out the bottom of the inside of the unit with a shop vac. You never know what you’ll find inside! You may need to evict a rodent or snake, but most of the time you just need to clean out the dirt, leaves and dead grass. Then, use a brush attachment on your portable vacuum and carefully vacuum the fins. After vacuuming the fins, spray the outside of the fins with a good coil cleaner and wait 5 minutes. A mild detergent/water mixture works well too. Then simply use a garden hose to spray, from the inside to the outside of the unit until the water comes through nice and clean all the way around. If your unit does not come apart, spray to avoid the fan motor as much as possible. Either way, avoid directly spraying the compressor. If you just can’t resist it, and you spray the outside of the unit, be careful not to bend the fins that surround the coil with pressurized water! Spraying the outside of the unit isn’t recommended, since you will either get excessive water inside the unit or lodge dirt and particles deeper into the fins, or both.

You can rest the cover (the part that you removed earlier with the fan motor attached) on top of the unit for the next step: Using a cooling fin comb, work the fins carefully to clean and straighten them if they are badly bent. If there are a lot of bent fins, this could take some time. Cooling fin combs are not easy to work with but the ability of your cooling fins to dissipate heat is very important to the performance of your unit, so it’s definitely worth spending the energy it takes to straighten any bent fins you have as much as you can. You can easily figure out how many teeth you need on your fin comb by simply using a tape measure and counting the number of fins there are to an inch. That is the “tooth-count” you should buy for your fin straightening comb. Most fin combs have 4 different tooth count combs. Finally, reverse the dis-assembly steps by re-attaching the top of the unit in the same way it came off. Then, plug your main cutoff back in, then go inside and turn your thermostat to the “cool” position and lower the temperature setting enough to make the unit come on.

Many units have a timing mechanism that delays the unit from coming on for a few minutes. Go back outside and listen for any odd noises (once the unit is back on) to double check everything and that you re-assembled everything correctly. If you hear something out of the ordinary and don’t know what it is right away, then I recommend calling a professional to come and check out your system for you. Tips: Clean your air conditioner condenser early in the spring. Most A/C companies are busy all summer repairing and replacing units and you may have to wait before someone comes out or have to pay a premium. While the unit is open, look closely at the bottom of the unit for dark oil spots near the compressor. If they are present, you may have an oil leak from the compressor and your system may need to be repaired and charged with freon. Have a professional come out and take a look. Visually inspect the large flexible conduit that comes from the unit to the main cutoff for breaks.

This is known as the whip. If it’s broken or damaged, it should be replaced. Inspect the insulation around the pipe that goes to your indoor unit. Although it is arguable that this piece of pipe insulation has little true function, it is good for aesthetics and it helps protect the pipe. Replace it if it’s worn. Do not attempt to replace the “pad” that the unit sits on. There are so many fragile parts that you will probably only be asking for trouble. If your pad is broken or sinking, consult a pro. They will usually tell you to wait until the compressor needs replacement before changing it out for a new one. A good cleaning brush for cooling fins is a toilet bowl brush. Just remember to be very careful when brushing the very fragile cooling fins. Now is also a good time to replace the filter at your blower or return duct, indoors. They cost a couple of bucks or less. A note about filters…there is no such thing as a 60-day or 90-day filter. Change your filter every thirty days.