no power outside ac unit

Twice in five years I’ve cleaned my outdoor AC condenser, and both times I’ve been amazed by the amount of dirt and leaves I’ve found. Fortunately, cleaning your outdoor coil is a task that any homeowner can accomplish, and it doesn’t take very long. A good cleaning will help your AC unit to function more efficiently, and potentially make it last longer too. Read on to learn how I removed the fan, outside panels and scrubbed away a lot of dirt and debris from my outdoor AC condenser. Editors note: This post originally ran in August 2009. In a related post about AC maintenance, one reader asked about cleaning an outdoor condenser unit, which prompted us to update this post with more pictures and information. If you find it helpful, give it a +1. Else, leave a comment and we’ll try to make it better. The coil transfers heat from your home to the outside, and this process works best when air can move freely. That’s why outdoor units have those big ‘ol fans. When dirt and leaves block up air passages, it’s that much harder to cycle enough air.

Plus, dirt and even dust can settle on the AC fins making them much less efficient. This in turn raises operational costs and shortens the lifespan of your compressor. This project doesn’t require much in the way of tools. You’ll need a nut driver to remove some metal screws, a hose, and a scrubber. I’ve got a handy brush that allows me to attach the hose and pump water through the bristles. Cleaning my condenser is pretty much the perfect application for it. It’s best to start by turning off the breaker supplying power to the unit, and hopefully your panel is labeled better than mine. Next, remove any nearby obstructions. Most installation manuals will let you know the minimum clearance around and above the unit. If you don’t have access to the manual, try for at least two feet. My unit has louvered sides held together with a lot of metal screws, and I’d estimate I removed about 30 screws all together. Fortunately, they’re all the same. Just keep track of where they all go.
If your unit has a grill instead of louvers, don’t even bother taking the sides off. You can effectively clean everything as is. You’ll see screws around the perimeter, at the corner where the top and sides meet (not the screws circling the fan). After you remove all those screws, the top (and fan) can be lifted off. Be careful because the fan is tethered with electrical wires. If the installers had any sense, they left a generous length of wire and you can lean the top nearby.
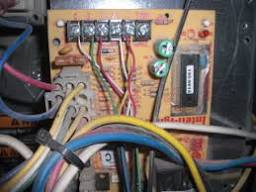
single room heating cooling units This picture shows the electrical compartment.
how to install ac unit on wall And here you see the compressor.
home ac outside unit not running The side grills have more screws at all the corners and along the bottom edge.

After you remove these screws you’ll see how the sides overlap and can be lifted up and off. It’s a good idea to remember where each panel was located. They should be identical, but this’ll help ensure that screw hole line up when you put it back together. Use your hose and brush to clean the grills, and hose down the fins (do not scrub the fins!). The fins maximize surface area for the heat exchange so if you accidentally mash them together, they won’t work nearly as well. Even an invisible layer of dust decreases efficiency so run your hose over everything (except the electric). I think this was the beginnings of a nest. You can see the fins and a few places where the fins are bent- probably from when the previous owner had the compressor replaced. This shows some of the gunk I found on the fins. And here’s everything bright and clean.When was the last time you cleaned your outdoor unit?This question and answer page will help you to troubleshoot why there is no power going to outlets in one room or on one wall.

Remember to always remove or disconnect power before troubleshooting electrical issues.Question: The power outlets along one wall are no longer getting power to them. The outlets that stopped working are located in our kitchen. This problem is only happening on one wall not the complete room. The dining room and kitchen are side by side and separated by a wall with the outlets that are not working. The outlets on the dining room side wall are still working. So our issue is just one wall of outlets in our kitchen where we plug in all of our appliances is not working. We checked the breaker box in the garage and no circuit breakers have been tripped. There is no GFI reset button on the outlets to press. What can I do to troubleshoot and fix this?Answer: The first thing to do is to unplug everything that is plugged into all the outlets that do not have power. Then reset the designated (and hopefully labeled) kitchen breaker in the breaker box by turning it off and then on again. Sometimes a breaker will look like it is not tripped but in reality it is.

By turning it off and then back on, you are making sure that the breaker is on and supplying power to that region of your house. Check to see if you have power on that wall and if so then it was just a tripped breaker. If this did not solve your issue, see below for what to do next.If the breaker is on and the outlets are still not getting power on that wall, be sure that even if one of them is a GFI that you press the reset button. If there is no GFI reset button, then your issue may be that one outlet is damaged or has a loose wire. This could be causing the other outlets to also have no power. In simple terms, the outlets that are not working may be daisy chained. Think of it like the old Christmas lights. When one went out, they all went out. Your outlets may also be wired this way. You must determine which outlet is the first in the row to not be working. Most likely that outlet will be the one that has a loose wire or has become defective or possibly burned.Newer USA outlets have an easier way to install the wires.

These outlets save time when installing an outlet but sometimes the wires can come loose. These type of outlets are called back stab or stab-in outlets. If you have these type of outlets then you can check to see if possibly a wire has popped out. Turn off the breaker to the outlet before doing any type of electrical troubleshooting. Remove the 1 screw holding the wall plate on. Remove the 2 screws that hold the outlet in place. Pull out the outlet carefully and check to see if all wires are connected. If you find that the outlet has a loose wire, you can either push the wire back into the connector it came loose from or wire it to the screw connector so it does not pop out again.If you did find an outlet that had a wire come loose and you fixed it, reinstall the outlet and turn the breaker back on. Get a night light or something simple and plug it in and be sure it lights up. If so then check the rest of the outlets and they should all now be working properly. If you encounter a burned outlet, then it will need to be replaced.