how to remove outdoor ac unit

Edit ArticleHow to Service an Outdoor Air Conditioning Unit This article shows the steps on how to service your outdoor unit at your home. And will list the equipment needed to do it successfully. Make sure that the dust covers from the service ports are removed. Connect your service manifold gauges. Be sure the service tank is connected to the yellow line of the manifold gauge properly. Open the service ports on the outdoor unit. Open the service port to the service tank. Read your gauges to see what you pressure is. Once servicing is accomplished turn off the service port to the service tank. Make sure that all the refrigerant from your gauges has made its way into the outdoor unit. Make sure that system pressure is equal to what is being called for. Close off the service ports on the outdoor unit. Disconnect the manifold gauges. Make sure there is no left over air pressure in the manifold gauge after disconnect. Reinstall the dust caps to the service ports.
R-134a is a refrigerant that is less harmful to the ozone. R-22 is the most common type of refrigerant but, it's harmful to the ozone. R-134a is the new replacement for R-22 it operates at different pressures compared to its R-22 counterpart. Most units have interchangeable parts, so the units have the same type of refrigerant. On the manifold gauge the red line is high pressure, and the blue line is low pressure. The yellow line goes to the service equipment. Protective devices must be worn for safety when servicing. In the United States it is against the law for anyone other than an EPA-certified technician to handle refrigerants. It is unlawful to vent refrigerant into the atmosphere. You could be fined up to a 20,000 dollars. Make sure that the same type of refrigerant is being added, to what is already in the system. Different refrigerants have different operating pressures, and could damage the unit if not observed. Keeping ants out of your air conditioning unit can be difficult.

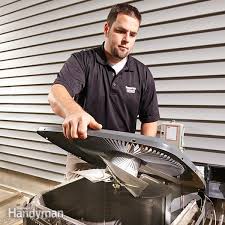
Removal is critical though. Nesting ants will corrode and eventually destroy your air conditioning unit. By the time ants have nested in a home, or unit, their pheromone trail is strong. Even if you eliminate the ants, you'll need to eliminate that odor trail that tells other ants there's a great homestead in your unit. Step 1: Determine Extent Of Infestation If you're seeing ants come and go from your air conditioning unit they may be nesting, or just feeding on something inside the unit. Determine which it is by opening your unit. Exterior air conditioning units have two basic parts—the outdoor unit with the compressor/condenser. This usually sits outside your house. And the indoor unit, which is usually located near your furnace and contains the evaporator part of your air conditioner. Shut off the electrical power to the unit. Some units simply unplug at the unit, others need to be turned off at the main breaker. Remove any exterior housing or cover to the outdoor unit.

Unscrew or unbolt the grill on top of the unit and lift it off. The fan motor and fan may come with it, so be careful not to stretch or pull electrical wires loose. Lift the fan and motor out if they don't come out when you remove the grill. Once this is done you should be able to see inside the unit and determine how serious your ant problem is. If ants are simply feeding on dead insects, ants or debris in the unit, remove the food source and proceed to Step 2. Step 2: Kill The Nest If you have nesting ants inside your unit you can kill them immediately by pouring boiling water over the nest.
ac unit selectionOr you can use a commercial ant spray to spray the nest.
ac repair manuals freeIf you want to take a longer, less messy approach, sprinkle borax around and inside the unit.
what is cost of new air conditioning unit
Wait a week to 10 days, then return and clean out the dead ants. If ants aren't nesting, but are simply feeding, remove the food source and kill remaining ants. Kill them with ant spray, borax (takes a week to 10 days) or boiling water. Step 3: Clean Out Dead Ants Once you've killed your ants, you'll need to remove any scent trails, as well as the nest or any debris in the unit. Remove the fan and fan motor and protect them from water spray by placing a plastic trash bag over the motor and any exposed electrical wires. Spray down the inside of the unit, the cooling fins, and all non-electrical parts with your sudsing ammonia and allow it to sit for 15 to 20 minutes. Using your hose and attachment spray from the inside of the unit out to force dust, dirt, debris, ants out of the unit to the outside of the unit. Replace the fan, fan motor, grill and protective unit and turn your power back on. How to Seal Space Around an Air Conditioner UnitAir conditioning, heat pump or refrigerator / freezer refrigerant gas or liquid leaks:

How do we repair refrigerant leaks in air conditioning, heat pump, or other refrigeration systems? This article series discusses how to repair refrigerant leaks in air conditioning and cooling systems, using as an example, repairing a leaky or damaged air conditioning the cooling coil (evaporator coil) in the air conditioning air handler unit. Our photo at page top shows the cooling coil in the attic air handler component of a central air conditioning system. As we explain in our articles on lost cooling capacity or air conditioning systems or heat pumps that are not working, a refrigerant leak in your air conditioner or heat pump means that eventually it will just not produce cool air (during air conditioning) nor warm air (during heating if it's also a heat pump). First we need an accurate diagnosis of the air conditioning problem. If your air conditioning or heat pump system has lost cooling (or heating) capacity, there can be various causes besides loss of the refrigerant in the system.

As we also introduce at CONDENSING COIL REPAIR REPLACE, there is a big payoff in cleaning dust, debris, grass clippings off of a dirty refrigeration condensing coil (this includes outdoor condenser/compressor units for air conditioners and heat pumps and also the condensing coil on a home refrigerator or freezer). Because a refrigeration system works by transferring heat from hot refrigeration gas/liquid to ambient air around the condensing coil, if the condenser coil is blocked by dirt and debris, this can prevent complete cooling of the high temperature refrigerant gas back to a liquid state. The result is you'll get refrigerant gas bubbles passing through the refrigerant metering valve. On refrigeration systems that include a sight glass you can actually see these gas bubbles passing through the system. More details are at REFRIGERANT SIGHT GLASS. Gas bubbles in the liquid refrigerant line can result in complaints of running water, gurgling, burbling, or similar sounds coming from the refrigerant piping system.

See REFRIGERANT PIPING GURGLING. Watch out: Incidentally a second source of bubbling sounds heard in the refrigerant piping suction line near the compressor could be refrigerant oil pooling in that location. This oil pooling is not usually a consequential problem provided the collection of oil does not block passage of refrigerant in the system. In good HVACR design the refrigerant piping slopes back from the evaporator unit (cooling unit or air handler) towards the compressor/condenser unit so that refrigerant oil in the line finds its way back to the compressor motor. At HVAC school we were taught that some HVAC technicians, in the opinion of the instructor (and our own as well), like the idea of a "delivery route" business, coming around periodically to replace lost refrigerant. In our view in many circumstances this can be a questionable practice. Air conditioners and heat pumps are designed as a closed, hermetically sealed system - they are not supposed to leak refrigerant, and refrigerant leaks are an abnormal condition.

The refrigerant leak can be found and repaired. If the technician was in a hurry, perhaps given many service call assignments, or if s/he didn't want to be hassled by a customer complaining over an "attempt convert a simple recharge to a costly service call", or if the company just likes to deliver refrigerant (lots of repeat business), or finally, if the system with the refrigerant leak is large, commercial, complex, and old - at end of life, s/he may not have mentioned that refrigerant leak repair is even possible. If you are faced with a costly service call or repair on an old air conditioning system (such as the need to replace a corroded, leaky evaporator coil) on a system that is at or near end of life, it is understandable that you might just prefer to wait and replace the whole system. But it is not air conditioner or heat pump system age that makes a refrigerant leak able to be found or not, it is system complexity. Sometimes, especially with large complex commercial systems, because tracing all of the piping and tubing and looking for leaks is time consuming, some people opt to just add refrigerant.

Just adding refrigerant is not the best practice. And with old freon-based cooling or heat pump systems such leaks might be illegal as you are damaging the environment and making a prohibited release of Freon gases to the air. The refrigerant gauge set photo above is discussed in detail at GAUGE, REFRIGERATION PRESSURE TEST. A step by step example of adding refrigerant to an air conditioning system using a rather minimalist approach is illustrated at SPLIT SYSTEM AC / HEAT PUMP REPAIRS. Sorry to ask readers to click again but for more space we have moved this topic to REFRIGERANT LEAK SEALANT USE "Stop leak" products have been in use for decades, particularly in the automotive industry where they were used to address leaks in automotive cooling systems. Those products traditionally used a carrier and fibers (originally asbestos) - an approach not suitable for refrigeration systems whose refrigerant metering devices may not tolerate particulates, even small ones.

Since the 1980's several inventors (e.g. Packo & Bailey 1980, 1982, 1984) have patented other approaches (and chemistry) for sealing small leaks in refrigeration systems. Some of these refrigerant leak sealant products use triethoxyl (vinyl) silane that forms a seal when exposed to air and can seal small openings in refrigeration systems without clogging up the capillary tube or thermostatic expansion valve. This discussion has moved to COOLING / EVAPORATOR COIL REPAIR I f an evaporator coil is leaking (or also if the condensing coil is leaking) you'll find out pretty quickly as refrigerant will be lost and the cooling system will stop providing cool air. You'll need expert diagnosis by an HVAC service technician. Sketch at left courtesy of Carson Dunlop Associates. For an example of coil replacement costs see our condensing coil replacement discussion at CONDENSING COIL REPAIR REPLACE . Watch out: good practice following work on refrigerant piping systems or system evacuation and recharging within refrigerant includes the installation of a debris filter and refrigerant drier device.

at REFRIGERANT DRIERS & FILTERS In case you didn't realize it, in order to solder a repair in an air conditioner or heat pump piping, tubing, evaporator coil/cooling coil, or condensing coil, it will first be necessary to remove all of the refrigerant from the system. The HVAC technician will connect a pump to pull a vacuum on the system to remove as much air, gas, debris, and moisture as possible. An evacuator pump is needed for this step. [We made our own vacuum pump using a particularly good performing Frigidaire rotary compressor retrieved from an abandoned antique refrigerator.] The HVAC technician will probably want to install a refrigerant filter/drier (see our photo below) to remove any moisture that leaked into the system while it was open to the atmosphere, and perhaps she will install other filtration equipment on the system at this time. It's a good idea. See GAUGE, REFRIGERATION PRESSURE TEST for details about the refrigerant charging procedure using a gauge set and charging cylinder or scale.