how to build a ac unit

Edit ArticleHow to Build Your Own Air Conditioner Two Methods:Build Your Own Air Conditioner with a Box Fan and a CoolerBuild an Air Conditioner Using a Recycled RadiatorCommunity Q&A Air conditioning uses up 20 percent of all of the electricity used in the U.S. If you want to skip the expense of air conditioning or help the environment, then you can build your own air conditioner with either a box fan and a cooler or with a box fan and a radiator. Follow this guide to build your own air conditioner. Unscrew the front gridded panel of your box fan. Twist 1/4" (6mm) diameter copper tubing in concentric circles starting at the center of the exterior side of your grid. Attach the end of a length of copper tubing to the center of the grid using zip ties. Twist the tubing into a tiny circle. Continue twisting the tubing around the original circle until you have a series of concentric circles. Connect the tube to the grid with zip ties. You want plenty of tubing attached to your fan grid, but not so much that air can't pass through the spaces between the tubing.

Screw the front, with the tubing attached to the exterior, back onto the box fan.
how to tell what size ac unit you have Attach one end of a 3/8" (9.5 mm) clear pliable tube to your fountain pump and the other end to the top end of your copper tubing.
average monthly cost window ac unit Connect the other piece of 3/8" (9.5 mm) plastic tubing to the bottom end of the copper tubing.
how much should i pay for an ac unit Fill the cooler with ice water. Place the fountain pump in the cooler. Put a towel under your fan. Plug in the fountain pump and turn on the fan. Clean your radiator before you use it. Place a high-speed fan behind the radiator. Attach a garden hose to a spigot on the exterior of your house.
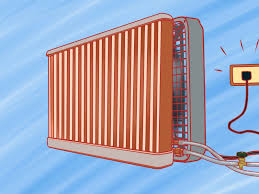
Connect the vinyl tubing to the inlet tube on your radiator. Feed the tubing through a window and attach the tubing to the spout end of your garden hose with duct tape. Coil your garden hose up and wrap it in a towel for insulation. Attach another length of plastic tubing to the outlet tube of your radiator. Thread the tubing upward through your window so that the water is expelled onto your roof or into your gutters. If you expel water onto your roof, then you'll need to make sure that the overflow hitting the ground doesn't flood your basement. Try placing a large plastic garbage can beneath the stream to catch the water, and recycle the water in your garden. Attach a small hand valve to the plastic inlet tubing that goes into the radiator. Cut the plastic inlet tubing to leave a 6" (15 cm) stub attached to the copper inlet tube of the radiator. Attach the end that releases water to the stub of inlet tube. Connect the side that pulls in water to the tube that's connected to your garden hose.

Open the hand valve completely. Plug in the fan and turn it on. Change the ice water in your cooler every 8 hours or so. Make sure to use the wastewater to water plants or to water your lawn. If you don't own your own home, then make sure you discuss expelling water onto your roof or into your gutters with your landlord. Be prepared to repair or replace your window screen when you move out. Water and electricity don't mix.Here’s what you need: Table fan - $16 Bucket lid - $3.50PVC (cut into 3-inch segments) - $3.50 Mint spray paint - $4 Gold spray paint - $4 Styrofoam bucket liner - $6 each 1-1/2 in hole saw for drill - $12 Frozen gallon of water First, place the insulation into the bucket. Holding the insulation and the bucket together, drill right through both layers with your hole saw. To get enough pressure, you might need to hold the bucket against a wall or the ground. Repeat this step to make three holes in one line across the bucket, about 2 inches apart.

Disassemble your fan, unscrewing it from the base. We had to use the drill as an electric screwdriver for this part, because it was pretty tight. You won’t need the base for the rest of the project, so you can just toss it. Take the front face of the fan off, too. There should be little screws on the back of any fan (so you can take it apart to clean it). Use the front panel of the fan to trace a circle on the bucket lid. The fan will sit inside this lid, so make sure it’s the biggest part of the face you’re tracing. Cut the inner part of the lid out using a box cutter. Then, for a decorative touch, spray paint the bucket and your pipe fittings. This part is optional (but highly recommended by the aesthetes at BuzzFeed Life). We went with our favorite shade of mint. Then paint your fan and bucket lid a complementary color. Why not add a little gold to your life? Once it’s dry, it’s time to assemble! Put the pipe fittings into the holes.

If they’re a little loose, you can always use hot glue to keep them in straight. Then, insert your frozen gallon of water into the bucket, and put the lid on. Tip: It’s best to have two frozen gallons of water. This way when one melts, you’ll have another frozen one on hand, and you can refreeze the melted one. Put the two sides of the fan back together, then fit the fan front-first into the hole in the lid. Now, put that baby in your scorching hot apartment! To make it even ~snazzier~ we taped bits of tinsel to each pipe so you could see when it was working! And, this thing actually works. We used this temperature gun and clocked the air coming out at 64-66 degrees.How to build a shoe rack or table to hide an AC unit I finally did it! I’ve been wanting to hide the ugly AC unit ever since I moved into my LA apartment but I couldn't find the right piece of furniture that would give me access to the AC unit when I need it but conceal it when I'm not using it AND also give me a place to put my shoes.