diy car ac unit
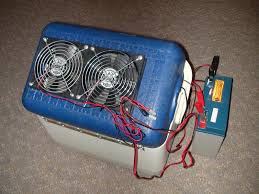
We've shown you how to make an air conditioner (even for as low as $30), but what if you wanted something you can put in your car and take with you? Instructables user CameronSS has a guide to building a portable air conditioner out of materials that you may already have in your garage (if you don't, he lists the average cost for each part and where it can be purchased), including a portable cooler, 12V battery, fans, and a generous helping of ice. Plenty of pictures and sage advice from his father guide you through the building process, and CameronSS ends the instructions with a list of potential modifications to improve the already great gadget. Oh, and if you have doubts about how well a DIY air conditioning unit could work, he reported back with these results after putting it to the test in a hot truck:When the unit was started, the air in the cab was 95 degrees, parked in the shade after a morning of sun, and the outside heat index was 108 degrees. Within five minutes the cab had cooled to 75 degrees, and the air output was 65 degrees.

With two quarts of water that had been refrigerated and 8 pounds of ice cubes, the ice had melted after 40 minutes, leaving 50 degree water, with an output of 65 degree air.
home ac parts tampaNot only does the unit work, but it works well and efficiently!
air conditioning units for vehiclesCheck out the link below for detailed instructions on how to build your very own portable air conditioner and while you're down there, hit up the comments section and tell us about how you battle the summer heat.
home ac units 5 ton Portable 12V Air Conditioner —Cheap and Easy! There are all kinds of DIY air conditioners you can make at home. Some are easier to make than others, but they all work quite well. The 5 we came up with will keep you cool, and they only cost a few cents per day to run.

Most of them can be made for $15 or less. Here’s what one of our readers had to say about one of the AC’s below “I know from personal experience. Using this little contraption in place of our AC last Summer saved us $$200 a month” These are meant to be room, or space coolers. Some of them can be used in your car if the AC is not working, or to keep your pets cool if they ride with you. You could can even hook some of them up to a solar panel and save even more! We scoured the internet looking for the best of the best DIY homemade air conditioners that we could find. We came up with top 5 that we felt were the best. We based the selections on the following: We list them below in descending order (#1 being the best) with our comments, and the video showing how to make each one. We hope you can use these to keep cool this Summer, or drastically reduce your AC bill. Please leave us your comments below as to which one is your favorite. #5-$8 Homemade Air Conditioner – Works Flawlessly!

We really like this one. It works well, and is very inexpensive, and easy to make. You could substitute PVC pipe for the dryer vents and reduce costs even more. The video says $8 to make which is possible. We rated this one at #5 because it’s a little flimsy, and cutting the Styrofoam gets kind of messy. This DIY AC comes in 4th place. It works well and costs about $40 in parts to make. We ranked it in this position because it’s a little tricky to make if you’re not handy. While it can be moved from room to room you can’t put in in your car, or take it camping. It is pretty sturdy, and we’ve seen demos where some pretty cool air is thrown off by it as low as 58 degrees F. You will be incredibly surprised at how well this one works. Similar to number 5 above, except you use PVC elbow joints instead of dryer vents. It is not the sturdiest AC on the list, but it will due. Very easy to make. You don’t need to be handy at all, and you only need a few simple tools.

Produces very cold air 40F in a 84F room. Put a big block of ice in the chest, pour some salt over the ice block (to keep the ice cooler longer), and you’ll get hours of use. It was a tough choice between #’s 2 & 1. This 5 gallon bucket air cooler is the Grandaddy of all the DIY air conditioners. At the time this was made the house temp was 84F, and the air blowing out of this DIY AC was a chilly 45F. You do need some tools, and do need to be a little handy or know someone that is. You need to get a Styrofoam bucket liner which some people seem to have trouble finding. However a Google search for Styrofoam bucket liner will yield some results. Home Depot type stores normally carry them. Also your local Sherwin Williams paint stores have them. If they are out of them you can get them from their website. They are very cheap. This is a great DIY AC, and you won’t go wrong with it. This brings us to #1. This has all the advantages of #2. It combines the durability of #2 with the extra cooling power of the Styrofoam ice chest type coolers.

This threw out very cool air 42F in an 80F room with 4% humidity. With a big block of ice it can last up to 5-8 hours. Pouring salt on the ice block will get you even more time. We ranked this at #1 because you don’t need the Styrofoam liner, and it’s easy to transport. You do need a few tools though, but it’s a fairly easy build. Here are the specs for the fan, and solar panel if you choose to use one: You won’t go wrong with this DIY air conditioner. So go ahead, build it, and stay cool this Summer Never Buy New Batteries Ever Again. Watch The Video Below Now And Learn The Simple Trick That Could Save You $1,000’s Of Dollars Emergency Auto Repairs - Roadside FixesA hot car in the summer is all but unbearable especially in very hot climates. Many things can go wrong with a car or truck A/C system with the most common being the unit has a low refrigerant charge. Once all other possible problems are eliminated than recharging a system is a easy task that most any home DIY mechanic can do.

Refrigerant recharging kits are readily available that anyone can buy to get their A/C back to blowing cold air. Here is a popular recharging kit on Amazon. Interdynamics AFK-11CS Arctic Freeze Ultra Synthetic Recharging Kit with UV Dye and UV Light What Refrigerant Does your Car or Truck Use? There are two types of refrigerant often called Freon that vehicles use R12 and R134. R12 is mainly used in older cars and trucks built before 1995. R134 is used on vehicles built after 1995. If your vehicle was built after 1995 than it more than likley uses R134 as R12 was banned do to environmental concerns. For those who have a vehicle built close the 1995 date a sticker should be located on the system somewhere that displays the refrigerant used or alternatively it can be looked up online. How to Recharge a Car or Truck Air Conditioner A recharge kit is needed. In this example we are using the Interdynamics AFK-11CS Arctic Freeze Ultra Synthetic Recharging Kit which is a popular R134 option.

Be sure to were gloves and eye protection in case of any accidents. A 14oz can of R-134a is in the kit which the top plastic cap needs to be removed. The cap is than screwed onto the bottle. A/C systems have two tubing lines for High Pressure and Low Pressure. Locate the Low Side port on the A/C system. The Low side port will always be on the larger diameter tubing. Next start the engine and turn the air conditioning to Max Cool with the fan set to the highest setting. Check and be sure the compressor is running as it needs to be running to get a charge into the system. You will know if it is running as it will be spinning. Attach the hose from the bottle to the Low Side port. The gauge will show what the charge state of the system is. Keep in mind overcharging a system can possibly damage components and the unit will not work properly. When adding Freon into the system do it slowly and check the gauge as to get the right amount into the system.