cleaning air conditioner inside unit

If you own an air conditioner, you might notice that after a while it appears to be pumping out less air, and is becoming less effective at cooling your home. While there’s a wide range of things that could potentially be causing this, if you want to try and restore your air conditioner to its full capacity, the first thing on your to-do list should be a full and thorough clean. While many modern air conditioners come equipped with self-cleaning functions, nothing beats a proper hands-on clean of the various bits and bobs within your unit that can get clogged with dust and dirt over time. So for those unfamiliar with the process, we’ve put together a step-by-step guide detailing how to clean your air conditioner, and turn it back into a lean, mean, cooling machine. Note that this guide has been written for split-systems, so if you have a vented, window, or portable air conditioner, your unit’s cleaning needs may vary from what’s outlined in this article. For this first step and all following steps, you’ll need to turn off all power running to the air conditioning unit.

Turn off any power point(s) it’s plugged into, and even turn it off at the circuit board if possible. You’re going to be dealing with the big outdoor component of your system for this step, and it’s crucial that there’s no power running through the system. So to access and clean the coils, you’ll need to remove the outer casing, which will most likely require a screwdriver or similar tool. Once you’ve removed the outer casing, remove any other components obstructing access to the coils, and then locate the coils. Brush off any surface dirt or grime using a stiff brush or duster, and then remove trapped or caked on dirt by applying a suitable cleaning agent, and then rinsing it away with water (spraying from the inside) after 10 or 15 minutes. While you’re there, you should check the coil fins, and if any appear bent or damaged, you can comb them straight with a ‘fin comb’, which can be purchased from most hardware or specialist air conditioning stores. It’s time to move to the indoor unit for this step.

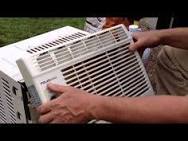
If you remove or flip up the front grille on the inside air conditioner unit, you should be able to remove one large mesh panel, or two smaller ones. These filter panels are your unit’s primary line of defence against airborne nasties such as dust and bacteria. However, this means that they tend to get dirty and clogged incredibly quickly, and need cleaning more regularly than other parts of the unit.
central air conditioning units reviewsThe flipside of this is that the filters are the easiest part to clean.
ac heater unit not working To clean the panels, simply take them outside, being careful not to dislodge any of the dust inside your home, and give them a bit of a bash on a railing or post of some sort.
york ac unit not cooling
This will dislodge most of the dust and grime, and any remaining nastiness can simply be vacuumed off. This is the part of the indoor unit that actually deals with blowing the cool air out of the unit and into the room it is serving. To access the fan coil, you’ll need to completely remove the indoor unit’s chassis, which will most likely require the use of a screwdriver or some similar tool. Once you’ve gained access to the fan coil, simply spray it with a suitable cleaning solution, leave it for a few minutes, and then rinse it off with warm water. Don’t worry about spillage or mess, as most if not all of the runoff will be caught in the drip pan. Rinse the fan coil until the runoff is completely clear and no solution remains, but be careful not to flood the drip pan! Allow it to drain off before rinsing further. Allow the fan coil to dry at least partially before putting the chassis back on. Once you’ve completed the three main steps outlined above, there’s a handful of smaller things you should do which will also go a long way towards keeping both you and your air conditioner happy and healthy.

It might be a bit of a chore, but cleaning your air conditioner is definitely worth the effort you put in. Not only does a cleaner air conditioner mean cleaner, healthier air, but it also makes for a more efficient air conditioner, which means smaller electricity bills! With those factors in mind, there’s really no good reason why you shouldn’t give your air conditioner a clean now and then – even if it’s only once or twice a year, you’ll still reap the benefits. Cheap air conditioners: What’s available? Is it worth buying an energy efficient air conditioner? click here to return to 'heater maintenance and troubleshooting' For the most part the average homeowner IS NOT able to repair their own air conditioner unit. Many of the repairs will involve removing the freon and that requires special equipment and you must be licensed to handle the freon. But a homeowner can keep the condenser and evaporator coils clean which will help the unit run longer and more efficiently.

For the purposes if this article, we are referring to a split system meaning that the condenser is located outside and the evaporator (A-coil) is located in the furnace. When cleaning the coils, use a foaming coil cleaner for the outside condenser, and a low-foaming cleaning for the inside a-coil. For the homeowner, purchasing a coil cleaner (available here) in an aerosal can is quite convenient and simple to use. Otherwise a person could purchase coil cleaner in gallon jugs at a local hvac or plumbing supply house. In this article we will explain using both type of cleaners. Step 1 - Shut off power to condenser and check to be sure it is off. Step 2 - Mix some high-foaming coil cleaner with water (per instructions) and pour into a sprayer and saturate the coils of the condenser. Spray the coils from the outside only. Step 3 - Let the coil cleaner soak for 10-15 minutes while you remove the top part of the condensing unit with the fan attached. On some units you may have to remove the whole top.

Cover with plastic bags anything electrical that may get wet. Step 4 - After 15 minutes, saturate the coils again from the outside. Step 5 - Let coil cleaner soak for 5 more minutes. Step 6 - With a garden hose inside the condenser, spray the coils so the water spurts to the outside. Never spray the coils from the outside as the water may pack the gunk tighter into the coils rather than pushing it out. Step 7 - Repeat until your rinse water runs clear through the coils. With aerosol sprays, how you clean the condenser coil depends upon the instructions on the can. Some cans are high-pressured, which means you lift off the fan and spray from the inside out. Foaming low-pressure aerosol's should be sprayed on the outside of the coil. Keep in mind that if the protective case around the outside of the coil inhibits spraying the coil, then spray the coil from the inside. Many sprays require no rinsing, just spray and walk away. Personally, I would do the cleaning twice.

First time I would spray and let it evaporate without rinsing (following the instructions on the can.) Then I'd spray a second time, and rinse a few minutes later (see above for rinsing instructions). Aerosol spray cleaners are available HERE. On the inside of your home in the furnace is the evaporator -- also known as the 'air-conditioning coil' or 'A-coil' because it's shaped normally like an 'A.' The A-coil must be kept clean as air from the blower must be able to freely flow through it during both the heating and cooling season. To clean your A-coil, follow these instructions: Step 1 - Carefully remove the panel to expose the A-coil. Don't damage any a/c or gas lines that may be nearby. Step 2 - Vacuum the dust from the coils (below). Stubborn dirt can be loosened with a toilet brush. The flat-style toilet bowl brush works best because it fits better along the bottom. Work carefully as the fins on the A-coil will bend easily. Step 3 - Spray low-foaming A-coil cleaner on the coils (below).

Do this step only if it's warm out and you can run the air conditioner for 30 minutes or more. Before spraying, put on gloves, goggles and a mask. Open all windows as the fumes may be strong. Mix the A-coil cleaner according to the instructions and pour into a garden sprayer. Spray the coils until saturated. Step 4 - Put the cover back on and turn on the a/c as soon as possible. Let the a/c run for at least 20-30 minutes as the condensation must flush the cleaner from the coil. Do not flush the A-coils with water. If the coil cleaner isn't removed right away, it may damage the coils. It may take several cycles to totally rinse the cleaner from the coils. After the first long cycle, normal cycles are fine. A note about coil cleaners. Some cleaners are designed only for the condenser coils, some are designed for the evaporator coils, and some are designed for both. The cleaners should be non-acid. Again, use high foaming for the outside condenser, and low or non-foaming for the inside a-coil.
Also, if the smell of the cleaner bothers you, mix a 50/50 solution of water and bleach and spray it on the coils as well. The bleach will eliminate most, if not all of the smell of the coil cleaner. Also pouring a 1/2 cup to 3/4 cup of the 50-50 solution in the drain pan will also help the smell, but is for the drainline and keeps it clean of bacteria, germs and odors. It also helps prevent clogs. For the homeowner, there's nothing simpler than using a foaming aerosol spray to clean your a-coil. In a nutshell, you spray and walk away. Then again, if your a-coil is really caked with dirt, you might first want to vacuum and such as previously described. Don't overspray as you don't want to create more foam than your drip pan can handle without spilling over. As the foam cleans, it does quickly break down. Unlike some mixed cleaners, most aerosols have a pleasant smell and won't harm the coil. Aerosol cleaners are available HERE. click here -- HVAC PARTS -- click here If you have a more specific question or need further help, please post your question to our forum.