air conditioning units installation instructions

Edit ArticleHow to Install a Split System Air Conditioner Three Parts:Install the Indoor UnitInstall the Outdoor CondenserComplete the Split System Air Conditioner InstallationCommunity Q&A Most people hire a professional to install a split system air conditioner. However, if you have some experience with plumbing and electrical work, you can install the unit on your own. Each split system or ductless air conditioner is unique to its manufacturer, but this article explains the general instructions for installing a split system air conditioner. Select an unobstructed location on your interior wall to mount the indoor air conditioning unit. Avoid direct sunlight and heat sources. Avoid locations where gas may leak or where oil mist or sulphur exists. The indoor unit requires at least 6" (15 cm) of open space surrounding its top and sides. The unit should also be mounted at least 7 feet (2.13 m) above the ground. Install the unit at least 3.3 feet (1 m) away from antenna, power or connecting lines that are used for television, radio, home security systems, intercoms or telephones.

The electrical noise from these sources could cause operational problems for your air conditioner. The wall should be strong enough to hold the weight of the unit. You may need to construct a wood or metal frame to provide added support. Secure the mounting plate to the interior wall. Hold the mounting plate against the wall where you want to install the indoor unit. Use a level to make sure the plate is both horizontally level. Drill holes into the wall at appropriate spots to affix the plate to the wall. Insert plastic anchors into the holes. Secure the plate to the wall with tapping screws. Create a hole in the wall to fit the piping. Find the best spot for the hole to the exterior based on the opening in the mounting bracket. You should also consider the length of the pipe and the distance that it needs to travel to reach the outside unit. Drill a hole that is 3" (7.5 cm) in diameter through the wall. The hole should slope downward toward the exterior to ensure adequate drainage.

Insert a flexible flange into the hole. Check the electrical connections. Lift the unit’s front panel and remove the cover. Be sure the cable wires are connected to the screw terminals. Also, make sure that they match the diagram that comes with the unit. Run the piping from the indoor unit toward the hole drilled through the wall. Minimize bending to ensure that the unit performs well.
central ac and heater unit Cut a length of PVC pipe 1/4" (6 millimeters) shorter than the length between your interior and exterior wall surfaces.
heat pump ac window units Place the pipe cap on the interior end of the PVC pipe.
portable a/c unit for vehicleInsert the pipe into the hole in the wall. Bind the copper pipes, the power cables and the drain pipe together with electrical tape.
Place the drain pipe on the bottom to ensure a free flow of water. Secure the pipe to the indoor unit. Use 2 wrenches, working in opposite directions, to tighten the connection. Join the water drainage pipe to the indoor unit’s base. Run the bound pipes and cables through the hole in the wall. Make sure that the drainage pipe allows water to drain in an appropriate place. Secure the indoor unit to the mounting plate by pressing the unit against the mounting plate. Choose the best place to install the outdoor unit. The outdoor unit’s location needs to be away from any heavily trafficked, dusty or hot areas. The outdoor unit needs 12" of space surrounding its perimeter to ensure proper functioning. Lay the concrete pad on the ground and make sure that it is level. The pad should be high enough so that the condenser will sit above the level of winter snows. Set the outdoor condenser on top of the pad. Use rubber cushioning under the unit's feet to minimize vibration.

Make sure that no antenna of a radio or television is within 10 feet (3 meters) of the outdoor condenser. Connect the electrical wires. Refer to the unit’s wiring diagram and make sure the cable wires are connected as the diagram suggests. Following the manufacturer's instructions for wiring is crucial. Fasten the cables with a cable clamp and replace the cover. Secure the pipes’ flare nuts to the corresponding pipes on the outdoor unit. Bleed the air and humidity from the refrigerant circuit. Remove the caps from the 2-way and 3-way valves and from the service port. Connect a vacuum pump hose to the service port. Turn the vacuum on until it reaches an absolute vacuum of 10mm Hg. Close the low pressure knob and then turn off the vacuum. Test all of the valves and joints for leaks.Replace the service port and caps. Wrap the joints of the piping with insulating covering and insulating tape. Affix the piping to the wall with clamps.

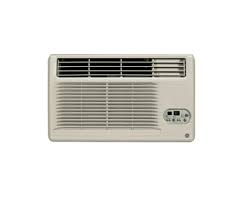
Seal up the hole in the wall using expanding polyurethane foam. Don't skip the step of insulating the tubing that runs between the indoor and outdoor units. In case the drainage pipe sweats, the insulation will prevent damage to your wall or studs. Provide a dedicated power outlet for your air conditioner. Always follow the manufacturer's instructions that come with your split system air conditioner when you're installing the unit in your home or office. Follow all municipal codes for electrical wiring and other aspects of installation. Some split system air conditioner manufacturers void the unit’s warranty if it is not installed by a licensed tradesman. Do not allow any wiring to touch the compressor, refrigerant tubing or any moving fan parts.Know Before You Buy Your Window Air Conditioner Determine the window where you’ll install your air conditioner. If there’s no three-prong outlet nearby, you’ll need an extension cord labeled for air conditioner use.
Check the load on the circuit you plan to use. If it’s also powering other devices, even simple ones such as a hair dryer, you may want to choose another window near a different circuit, add a dedicated circuit, or move those other appliances somewhere else to avoid a tripped breaker or blown fuse. Not every air conditioner fits every type of window. Determine whether your window is a slider, a double-hung, or a casement style. Most units work only in double-hung windows with a lower sash you can raise and lower. Also, measure the width and the height of the window opening to confirm whether an air conditioner will fit. Decide how much additional insulation and rain protection you’ll want to add around the window (beyond the air conditioner’s side curtains). For example, you may want to add pieces of white expanded foam insulation along the sides or within the gap between the upper and lower window sashes. How’s the weather outside the window? A west-facing window could catch enough sun to force the air conditioner to work harder.

Does the wind typically whip rain against that side of the house? Consider adding additional barriers to keep the water outside. If you have curtains or drapes at the window, consider adding a blind or shade. These options won’t block the air conditioner and can be adjusted to give you privacy. Shop Window Air Conditioners Prepare the Window for Your Window Air Conditioner Inspect the window to make sure it’s in good repair. After installation, you probably won’t open that window for months until it’s time to remove the unit, so now’s a good time to wash the glass inside and out. You’ll also want to clear the area around the window and leave yourself plenty of working space with no tripping hazards. Check for obstructions in the window opening, such as storm window frames or screens that might interfere with the overhanging part of the air conditioner on the outside. Raise or remove the screen and either remove the storm window (and frame) or fasten a spacer block to the windowsill to lift the air conditioner case away from the storm window frame.

CautionThere’s a reason to fasten spacers in place instead of leaving them loose. Weather, vibration, and the challenge of lifting a heavy air conditioner onto a windowsill can knock an unsecured spacer out of position, allowing the unit to tilt or even fall. Install Your Window Air Conditioner Follow the manufacturer’s instructions to prepare the air conditioner for mounting. This may include attaching brackets and the accordion-style side curtains, for example. Double-check the air conditioner’s measurements and compare them to the window opening. With the bottom window sash up as far as it will go, center and insert the air conditioner in the window. Keep it balanced as you slide the flange on the bottom of the case against the outside edge of the windowsill. Then lower the bottom window sash until it rests on the air conditioner and securely against the top flange. Good to KnowAvoid installing the air conditioner so the top tilts slightly downward. Depending on the model, this could keep condensation from draining properly out the back or bottom.

After balancing your air conditioner on the windowsill, it’s easy to see why you need that top sash to stay put and hold the unit in place. To prevent the sash from being accidentally raised, insert at least two screws through the upper flange on the air conditioner case into the window sash. The screws could possibly split the wood if you don’t drill pilot holes first. Use a bit that’s slightly smaller than the core of the screw. Then wrap a piece of masking tape around the bit so that it limits your drilling depth to the length of the screw. Then do one of the following: Attach the L-shaped clips that connect the bottom sash frame to the top sash frame, or cut spacers from 2-in. x 2-in. stock and wedge them between the bottom sash and the top of the window frame. Good to KnowNot all windows allow you to use L-shaped clips to hold the bottom sash in place. If your window resembles this vinyl window (to the right), you can make a replacement for clips by cutting strips of wood just long enough to wedge snugly between the sash and the top of the window frame.

We cut these from paint stirring sticks. Pull the side curtains out to the edges of the window frame to keep bugs and moisture and hot air from entering the room. Check the manufacturer’s instructions for directions on screwing or clipping the curtains in place. Expanding curtains help seal your room, but they’re no substitute for insulation. Consider cutting white foam insulation board to fit snugly around the opening from the outside if your window receives lots of sun. You can also buy accordion-style insulating panels and cut them to fit the opening. That gap between the frame of the lower sash and the window on the upper sash needs to be filled. If your air conditioner comes with a foam seal, you can cut it to size and slip it in place. If your foam filler disappeared during the winter while the air conditioner was in storage, you can buy them separately. Plug it in (use an air conditioner extension cord, if needed). That was probably hot work, so pour yourself a cold glass of water while you wait for your newly air conditioned room to cool off.