ac outside unit cover

If you live in Las Vegas, the last thing you want is to compromise your air conditioner. It’s sweltering outside by the beginning of June. What about the off-months, though, when it’s feasible to keep the unit off in favor of opening the windows to cool off or bundling up to keep warm? There are some schools of thought that indicate that you should cover your outside AC unit when it's not getting daily use, but it's really dependent on where you live. In places where there's very cold weather with snow and ice, many people do decide to cover their unit to protect it from the elements. Even in those areas, though, there's a danger that covering the unit may make it susceptible to vermin. Mice and small animals take up residence in warm, enclosed spaces where people don't often tread. Not only do you not want rodents in or near your home, you also run the risk of them chewing through wires and damaging the unit. In Las Vegas, there isn't much worry over exceptionally cold weather.

Your air conditioning unit will not likely see a lot of snow or ice, so the short answer is that there's not much reason to cover your unit to winterize it in this climate. For residents who moved to the area from cold weather states, this is probably a lovely reprieve from your past routine. However, the fact that you don't have to cover your air conditioner doesn't mean that you're off the hook for other maintenance. An air conditioner is a significant investment, so you really have it looked at once per year. We recommend setting your appointment for the spring so that you know your unit is working order for the heat of summer. Adding it to the calendar at the same time each year may help you stay on track. You can avoid larger maintenance issues by catching small ones early. You can also budget ahead for a larger expense of replacement when you have up to date knowledge about the health of your current air unit. Related: Las Vegas Heat Has Come... It's Time for Your Seasonal AC Checkup

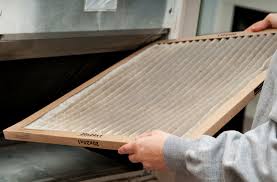
Just because you don't have to cover your outdoor air conditioner does not mean that you shouldn't be wary of problems caused by the outdoors in general. In the fall, make sure that your keep the unit and its surrounding area clear of leaves and other debris that could interfere with the efficiency of your condenser coil or unit. You should also change the filters with frequency.
ac power supply specificationsThere are different schools of thought on how regularly you change them and it may depend on the unit.
air temp ac units reviewsYour HVAC professional can give you some excellent pointers on setting a schedule for these easy, DIY maintenance tasks.
ac unit motor hot Related: Protect Yourself Against Fall Allergies With a Seasonal Filter Change

Whether you're experiencing difficulties with your air conditioning unit or just want to have a great company on hand for regular maintenance, The Cooling Company offers excellent service. Feel free to contact us with any questions or check out our online estimator to do some research in advance.Updated post: Summer is Coming, is Your AC Unit Ready? It is generally a good idea to consider doing some basic maintenance on your air conditioning and heating system at the beginning of every heating and cooling season. This past winter’s “polar vortex” has been especially tough on outdoor equipment. These ultra-low negative temperature spikes, along with the extended times below freezing, can affect your home air conditioning system’s Spring start up. But with a few checks and a little effort, you can help to insure a trouble-free summer cooling season. Spring HVAC Startup Checklist: Here are eight important things to check BEFORE switching the wall thermostat to cooling.
First, start with the outdoor unit: 1. Inspect the outdoor unit panels: These panels are designed to enclose the electrical connections and must be in place to help protect both you and the system. If you are missing a panel (possibly due to wind) or if the panel is misaligned, this could cause potential risks for both you and the operation of the equipment. If the panel covering the electrical connections is missing or out of place you should call a qualified technician for an assessment before starting your system. 2. Remove any condenser covers, coil blankets or lids: If you covered the outdoor coil in order to protect it during the winter months, be sure to remove the cover before starting the system. These covers protect and insulate the coil, but also limit any heat transfer. Starting the system with any of these covers in place, even for a short time, could severely damage your system. Many people forget to remove their covers every year, often resulting in major repairs or even replacement of the whole system.

3. Repair or replace any damaged pipe insulation: The suction line (the larger copper pipe on the outdoor unit) helps to supply cool refrigerant back to the compressor in the outdoor unit. If the system’s suction pipe has damaged insulation, this could cause a loss of required cooling for the outdoor unit which could damage your system and may also cause you to lose energy as well. Damage to the foam insulation can be caused by sun rot, freezing water trapped in the foam or winter animals looking for shelter or food. The insulation should be intact to maintain system cooling. If the insulation needs replacing, do so before starting the unit. Look on the copper pipe for a size (5/8, 3/4, 7/8, etc.) to determine the coordinate size of insulation. It might be possible to find the insulation at a local hardware store. NOTE: ONLY the larger line needs insulation. Do NOT insulate the smaller copper line. 4. Remove any debris from the outdoor coil: Depending on where you live or what side of the house your system is located on, you might find trash or vegetation blown into or against the coil.

The system coils are designed to transfer heat, and any debris limits this effect. To get the best possible performance from your system, remove this debris from the coil and surrounding area. Also, while mulching in the spring, take care to not pack mulch around the base of the unit. This is especially true for heat pumps as there’s likely a space under the unit and this should always be kept open to allow good air flow to the outdoor unit. Next, inspect the indoor unit: 5. Change the air filters: The change in seasons is usually a good time to replace your indoor air filters. The Polar Vortex this winter has probably caused your furnace to run a lot more than previous winters. It’s likely that your indoor air filter will have gathered a lot more debris and dust than normal, so be sure to change the filter before the 2014 cooling season. The link below provides a step-by-step guide to this process. (Be sure to pay attention to the airflow directions arrow on both the system and the filter – they both need to be pointing in the same direction).

How to Change Your Indoor Air Filter 6. Check the coil drainage hose: This hose (usually plastic) can also be called the “condensate line”. Since the coil’s temperature is lower than the ambient air, water will condense on the coil and drip into the tray below. This condensate needs to flow to a drain or the tray will fill up and flood the unit or potentially spill water into your basement. With the amount of time spent indoors this past winter due to the Polar Vortex affecting most of North America, it is possible that any impromptu soccer games or dodgeball matches in the basement might have moved this line. Check to make sure the line is in the proper place, attached, and will drain to the appropriate location. 7. Clean the supply vents and return grills: Make sure the both the supply and return air grills and vents are open and free of debris. It would also be good to use the vacuum to remove any pet hair or dust that might have accumulated during the previous season.

Some houses have separate winter and summer supply grills, or house zoning and some even have separate systems – one for heating and one for cooling. If you have a system like this you might have put extra plastic material over the AC vents to prevent drafts during the cold Polar Vortex months. If so, it is important to remove these before you turn on the AC or you will not have proper air flow back through the system and this could cause severe damage. In general, cleaning all grills at the beginning of every season is a good idea. 8. Turn it on and make sure it works: After going through the check list, wait for a nice, hot day when you have some time to check the air coming out of the indoor vents for the first few minutes after starting it, and then every few hours throughout the day. After the first few minutes, you should feel cool air coming out of the registers. If no air is coming out, or if the air coming out does not feel cool, then something is wrong and you should immediately turn the system off at the thermostat.

You can go through the check list one more time and then try it again. If the problem persists, turn the system off and call a good HVAC contractor who can diagnose the problem. Leaving the system turned on when it’s not running properly can do a lot of damage. It never hurts to ask a HVAC Professional to help diagnose the problems if your system is not working properly. In summary, a brief inspection of your system now could help keep your system running worry free through the heat of the summer and fall and is especially important for older systems. While performing this general inspection, take note of the overall system health in order to assess the likelihood of a problem. If your system is old and has endured an unusually harsh season, it might be time to call for help. A qualified technician can help you do a more thorough spring technical inspection to avoid a system failure in the hottest months of the year. The technician can also help address any concerns you have so let the contractor know what you found during your own spring inspection.